
If you are considering getting chickens, let me offer a bit of advice – DO IT! Not only will they provide you with those wonderful, fresh eggs each day, but they are a constant source of ENTERTAINMENT! You can read a lot about them, but it really isn’t until you have your own flock that you’ll understand what unique little creatures they are! Totally not what we expected!
Jeff had been wanting to get some chickens for our farm for quite a while. He loved reading about them in the Hobby Farms magazine, and even talked with various people about their “chicken experiences“. However, he was still on-the-fence about it. So I had started reading through my favourite online classifieds again, and happened across someone selling a small flock of young chickens (five hens and a rooster). They wanted them to all go together (otherwise, we may not have opted for a rooster). It seemed to be exactly what we needed to get started with our own “chicken experience“, so I got in contact with them. As it turned out, they would get a small flock each spring, keep the chickens for five or six months, and then sell them off before they went away for the winter. They still wanted to keep the chickens for a few more weeks, so I figured that should give us enough time to build a chicken coop.
Of course, nothing is ever quite as easy as it seems, and it did turn out to be quite a big project to complete in the short time we had, but we got it done! And the chicken coop and yard really did turn out amazing! The chickens seem to have really settled into their space, and I spoil them regularly with all sorts of goodies. They especially love fresh kale out of our garden, sprouted wheat (which I have been making for them daily), and cooked lentils (which has an incredible amount of protein to help them with their feather production when they are moulting).
Designing the Chicken Coop
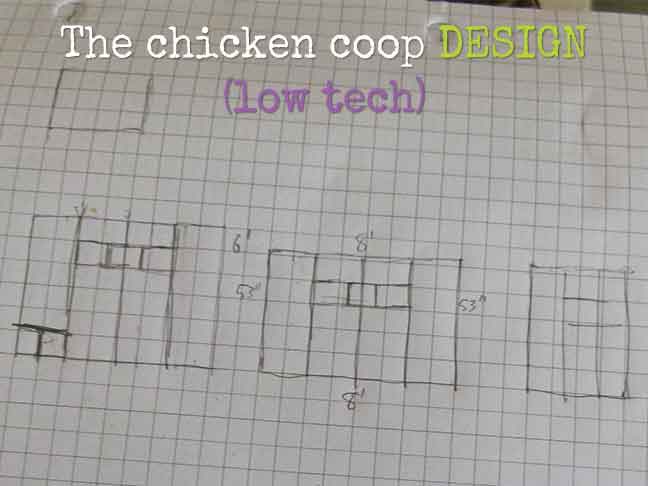
- This project started out with a lot of online research to get some ideas of what type of coop to build.
- We took several trips to different hardware stores and lumber yards, to look up close at their various shed designs, before we came up with our own plan.
- We knew the size of our flock in advance, so we decided on a 4 ft. x 8 ft. building.
- We wanted to construct a solid building for our chickens, but also wanted an economical solution that looked good too!
- We opted for a lean-to shed style of building, primarily because it would be the simplest roof to construct, but would also allow us to create the slope we needed (considering our snow load here).
Planning the Location and Framing the Chicken Coop Floor
We are fortunate to have a lot of space on our property, so finding a location for the chicken coop was not a huge issue. We found a spot nearer the mountain side, which would get some sunshine, but would have a number of shady spots for the chickens to keep cool too. We have a lot of young ash trees growing around the base of the mountain, so we also enclosed a few of those in the area we selected.
The construction started with the following steps:
- The skids were laid out and squared up, then the floor was framed in with 2″ x 6″ lumber.
- The base was filled with a few inches of gravel to help with drainage.
- The floor was made from a 4 ft. x 8 ft. sheet of 5/8″ plywood.
- Fence posts were measured out and pounded in around the chicken yard, making sure to account for where the gate entrance would be located.
- 8 ft. posts, 3-4″ in diameter, were used and were set about 2.5 ft. into the ground.
Click the thumbnails below to view larger images…


Building the Chicken Coop
The construction process turned out to be a great family project! The kids got involved in a number of different things, and even learned how to use some of the tools (under close supervision of course).
- The coop itself was framed using 2″ x 4″ lumber.
- We wanted to give the chickens as much natural light as possible, so we framed in two windows on the front, two on the back, and one on the side.
- We decided to MAKE our own windows as it was very difficult to find any reasonably priced SMALL windows anywhere. They were framed using 1″ x 2″ lumber, and a sheet of plexiglass which we cut to size. We used silicon to attach the plexiglass to the frames, and installed hinges on the windows so they could be propped open during the warmer weather. They are kept closed using hooks and eyes attached to the bottom of the frames.
- Wire hardware cloth (with 1/4″ openings) was stapled inside each of the window frames, to help keep any small critters from getting into the coop.
- A tile floor was installed over the plywood. We had found some really inexpensive tiles (VCT) which we thought might help with keeping the coop clean, and protecting the plywood floor. So far, so good!
- Ventilation is very important in the coop, so the space along the rafters was left open. We did, however, also staple hardware cloth along this opening (again, to prevent unwanted visitors in the coop).
- The inside of the coop was insulated, and plywood was installed over the insulation (everywhere but the ceiling, which we left with just the plastic over the insulation).
- We used “weathered” tongue-and-groove pine siding on the outside of the chicken coop, which we stained to match our house and other outbuildings.
- For the roof, we decided to try Ondura corrugated roofing panels. The price was comparable to metal roofing. It was quite easy to work with, but does require a number of its own special nails. So far it has stood up well to the various weather conditions that it has been exposed to, although the winds we get here have loosed the nails on occasion.
- We made the man-door to the chicken coop out of plywood, and attached siding to the outside. We put a barrel bolt lock on the outside, and a hook and eye inside (in case you needed to lock yourself in without worrying about the chickens getting out).
- The chicken door (to the yard) is 14″ x 14″. It is a plywood door that slides down over the door opening along some “tracks” we constructed along the inside edges. An eye hook was screwed into the top. We tied a cord to the hook on the door, which is run up through the roof opening, through additional eye hooks, to the outside of the coop. This works great for sliding the door up and down from outside of the coop.
- Outside, a plywood ramp was attached at the base of the chicken door. It has 1″ x 2″ strapping nailed across it every several inches, to keep the chickens from sliding off.
Click the thumbnails below to view larger images…


Finishing the Chicken Yard
Stucco wire was used for the fencing around the yard. It has 1″ x 2″ openings, so works well to keep out many of the predators. The wire was 4.5 ft. high, so we doubled-up to give us an 8 ft. high fence around the perimeter. We used “hog rings” to fasten the upper wire to the lower, allowing several inches of overlap. At the base of the fence, we bent the wire out about 1.5 ft, and used metal tent pegs to secure the wire to the ground. This was to help prevent any predators (such as coyotes) from digging under the fence. We ran some extra siding boards along the top of the fence posts for additional support too, as the fence wire goes up quite high.
In the chicken yard, we added a few additional accessories, such as some old wooden benches (which the chickens love to roost on during the day), and several tents we made out of scrap lumber pieces. These provide the chickens with additional shelter or shade during the day. We also made them a covered sand box, which we filled with play sand. They use this regularly for their “dust baths“, so we have to replenish the sand on a regular basis.
Click the thumbnails below to view larger images…


Accessorizing the Chicken Coop
Inside the coop, we installed a “garage-sale-find” bookcase, which is used to hold the chicken’s nesting boxes. Four plastic tubs were used as the nesting boxes, as they fit nicely in the bookcase, and are easy to remove and clean. Each tub is filled with wood shavings (pine) as the nesting material.
- Two roosting bars, made from tree branches, were attached across the front of the bookcase, to provide access to the nesting boxes.
- A two-level roost was made from branches, and some scrap lumber. It is attached at the far (short) side of the coop.
- A metal feeder is hung by a chain next to the door.
- A metal waterer is kept in the coop, and is used with a heated base under it during the winter. That worked really well, even during our -25° C weather.
- We made some feeders (using plastic containers and other plastic pieces that we repurposed) to hold their oyster shells and grit. These are kept in the lower shelf of the bookcase. The chickens use these free choice, and we have to refill both the oyster shells and grit regularly.
- We have a light in the coop (which we put on a timer for the winter).
- I made a few pictures to hang up in the coop, just for fun.
- Finally, we filled the floor of the coop with wood shavings and it was ready for our chickens!
Click the thumbnails below to view larger images…


The Chicken’s First Day in Their New Home
So, how did our new additions like the home we built for them? See for yourself… We were rewarded their very first day home with 5 EGGS! We managed to get a picture of the first two eggs ever laid in the new nesting boxes. And of course we grabbed a couple of pictures of our girls (and boy) the first day in their new home.
Click the thumbnails below to view larger images…


Cindy,
I have truly enjoyed reading all about your goats/chickens and looking at your pictures!
I love my 4 cats and 1 dog, gardening bird watching and being outside is my biggest enjoyment. After seeing your chicken coop it makes me want to build my own. Roughly how much money was the material? It’s great you were able to find a person that raises the chicks and wanted a home for them. Maybe I can get lucky like that as well.
The “Campbell Coop” turned out very nice. I am sure your hens are very “Happy”.
Nancy Cramer
Mt. Holly, New Jersey 🙂
Hi Nancy – Sorry for the late reply. Thank you so much for your comments. To answer your questions, the materials for the coop were probably about five hundred dollars. We did find some good deals, but some of the items do cost a bit more if you have to buy new.